

Winter Damage

The ability for a vine to withstand cold temperatures is limited by the genetic potential and the environment in which it grows. Concord grapevines are relatively hardy compared to other grape varieties grown in the eastern US, which is the primary reason why the Concord industry has survived for so long in Western NY. The subzero temperatures the Lake Erie region received on February 16, 2015 tested and exceeded the cold hardiness limit of many area vineyards and impacted all vineyards in the belt to some extent. The bud damage assessment following the Feb 16th cold event showed an average of 50% bud mortality across the belt.
Although temperature had a relationship with the amount of damage found, there was still a wide variation between vineyard blocks and within each block. There are many contributing factors to this variation such as the previous year’s weather, time of harvest, disease (see picture), vine health, and when the vine began the acclimation process for the dormant season.
Seasonal differences will impact all grape cultivar’s cold tolerance, and maximum hardiness will vary for year to year. The period from veraison to harvest has the most influence on vine acclimation leading to the cold hardiness. Water status of the buds, vascular system, and trunk will delay or induce vine acclimation. Wet conditions promote continued growth and slow down acclimation. In contrast, dry conditions help the vine acclimate by allowing excess water to leave various cell tissues.
Cropping levels can have a high impact on vine health and effect vine cold hardiness. High crop levels slow down the acclimation process and can lead to lower cold hardiness. This is where vine balance factors in. Average yield on a favorable site can be higher than a less favorable site. If there is vine balance at both sites they could have similar cold hardiness, but if either site is overcropped it can throw off vine balance and become more susceptible to winter injury.
Cold hardiness is made up of many complex mechanisms and processes that a vine goes through to survive exposure to low temperatures. Here are a few take away points.
Take Home Points:
Weather during the previous season has a great effect on cold hardiness.
Vines need to go through an acclimation process where they ‘harden off’ and develop cold hardiness/cold tolerance. This process begins in late summer when the shoots stop growing and become woody and ends as the vines go into dormancy.
Achieving vine balance and good vine health can optimize cold hardiness.
Crop level has an effect on bud hardiness. Over-cropping leads to decreased hardiness.
Management practices that reduce winter injury:
Grow balanced vines. Adequate vine size and crop level promote vine health.
Know soil health and properly adjust soil nutrients.
Increase soil drainage on sites that need it (tiling, cover crops, ripping etc.). The vines need to get rid of excess water after veraison, which can be difficult for vines on wet sites.
Grow multiple trunks and renew trunks on a regular basis.
When possible harvest sites when they reach target sugar. Sample sites and harvest accordingly. Do not follow the previous year’s harvest schedule… rotate when possible.
Vine diseases and pests that bring down vine health also bring down cold hardiness/tolerance. Take care of them.
How to Assess Bud Damage
Luke Haggerty, Viticulture Extension Associate
Lake Erie Regional Grape Program
Cutting buds is necessary to evaluate bud damage after a freeze event. After practice this process is as simple as making a single cut and scoring dead or alive on a sheet of paper. The most important part of accurate bud assessment is cutting the bud at the correct depth. When cuts are made too shallow live buds may appear dead and if you cut too deep dead buds will appear live when they are actually dead. The illustrations in this article show how to accurately cut buds for evaluation.
Collecting canes for sampling:
Collect healthy canes that should have viable buds (canes that would be saved when pruning). There is no need to collect diseased canes, laterals, or bull wood as these types of canes are less hardy and are not expected to have viable buds. Collect samples from areas in the vineyard that will give you the best representation of that area. Collect approximately 10-15 canes (100 buds) from different areas within a vineyard block.
Handling and Timing: If you are assessing your buds after a recent freeze make sure to give the buds enough time to oxidize (turn brown and black) and show the damage they have received. It is best if the canes are left in room temperature for 24-48 hours. From my experience the longer you wait after the cold event the better the damage shows up.
Making the Cut: The following examples show the cutting of a healthy Concord bud (figure 1-4). Remember cutting down to the correct depth is very important. Because depth is important it is best to make a series of shallow cuts when first starting out. Using a razor blade, make a cut that is parallel to the cane taking the top third of the bud off.
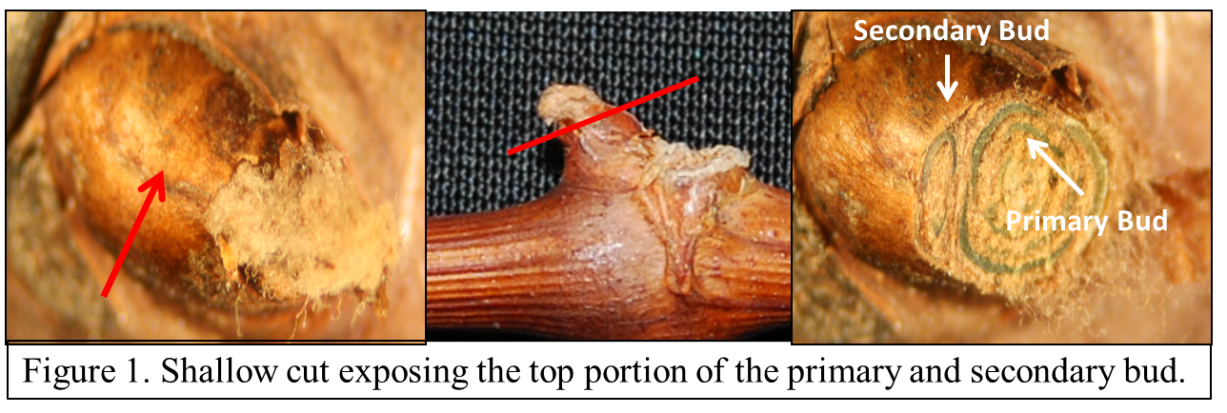
The cut in figure 1 is too shallow to get an accurate assessment if the bud is alive or dead, but it is a good look at the top portion of a healthy bud. The light brown material surrounding green tissue is normal and is not to be mistaken for damaged tissue.

Figure 2 is an example of the correct depth needed to determine if the primary bud is alive or dead. Bright green tissue signifies if the primary bud is viable/healthy and should be scored as an alive bud. The secondary in the figure 2 needs to be cut deeper for assessment.

Figure 3 shows the secondary bud cud at the correct depth for assessment. Be careful not to cut too deep. Figure 3 is the lowest I would recommend cutting for evaluation.

Figure 4 shows a cut that is too deep for a good assessment. The green tissue you see in this picture is the bud cushion. In most cases of freeze damage the bud cushion will still be green and is the reason it is important not to cut too deep.
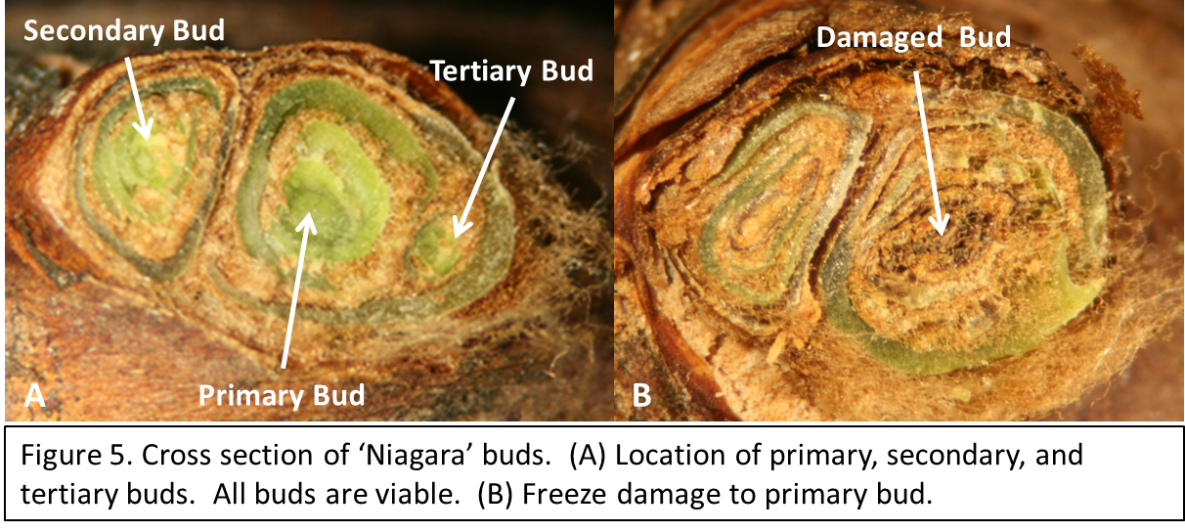
Tips: Make several cuts when you first start evaluating buds. Take time to use some sort of magnification (reading glasses or magnifying glass) to get a good look. Good lighting can make a world of difference. The light brown material surrounding the bud tissue in figures 1-3 are okay and are examples of healthy buds. Key color indicators of freeze damage are gray, brown/green tissues, dark green, dark brown, and black (see examples in figure 6). Practice makes perfect. Cut 200 buds before you start scoring the damage… or as many as it takes for you to feel comfortable with what you are seeing.

All pictures in this article were taken by Luke Haggerty
For more information on how to assess winter injury to buds or to see a video tutorial view: Assessing Winter Cold Injury to Grape Buds